You’ve built a great connection with your customers by creating your website, sending out an excellent email newsletter, and setting up your social media accounts. You want to push your relationship-building abilities to the next level, even if those choices are already in place. Is there any good news? A blog can help you achieve that. Continue reading if you want to learn how to easily add a blog to your website.
A step-by-step tutorial for beginners on how to create a new blog post in WordPress!
1st step: Log into your WordPress account.
Log in using your username and password at yoursite.com/wp-admin.

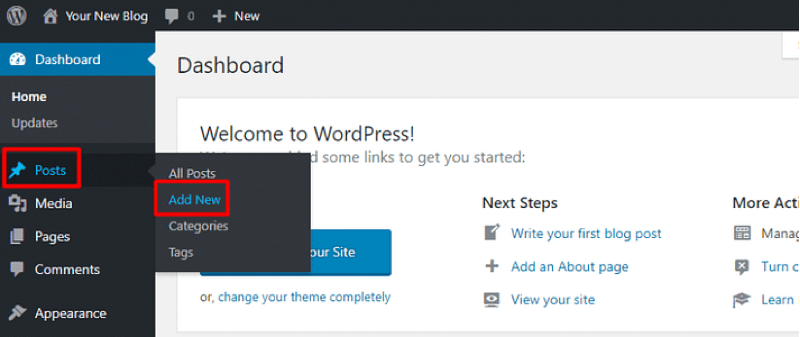
When you first log into the WordPress dashboard for your site, you should see something like this:

2nd step: Hover over “Posts “and click “Add New” to start writing a blog entry.

This is a very self-explanatory step. You’ll need a page for your blog because you already have a website and want to add a blog to it. You don’t want it to obstruct other important information on the page.
3rd step: Give the page a name.

Let’s call it “Blog” to make it easier to remember. Because you want the page to serve as a feed for your posts rather than a static read page, leave the text field blank.
4th Step: Publish the Page
You must publish your Blog page before it can become live. Don’t worry about the placement of the posts just yet; we’ll take care of that later.
5th step: Go to the Settings tab.

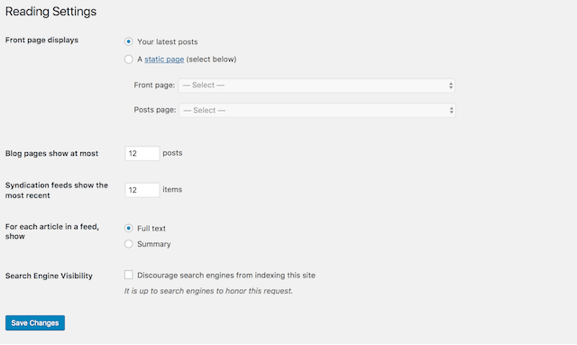
When you’re in your Dashboard, you’ll see a column on the left that lists all the things you can do with WordPress. To access the above page, go to Settings > Reading.
6th step: Assign the page you created as your Blog page
Choose “Blog” from the drop-down option for the Posts page after selecting a static page. It’s critical. The location of your blog feed is determined in this stage. If you don’t want your blog to be the landing page for your website, be sure you pick “Blog” from the drop-down option for “Posts page” rather than “Front page”.
7th step: Decide how many posts you’d want to have.
Basically, this is a matter of personal preference. When a reader clicks on Blog, how many entries do you want to appear? Five? Twelve? Experiment with various quantities to discover which you like. Save your work after that.
8th step: Write your first blog entry and publish it.
You’re now ready to start blogging! If you haven’t already, create an editorial plan for your content so that you can consistently publish high-quality material for your audience.
Write your first blog post with these tips.
Here are some ideas to keep in mind when you write your first blog article.
Don’t get tangled up in the details.
You may be nervous about your first blog post now that you’re gazing at the blank post page. It’s your first post, the one that introduces you to your followers and kicks off your blog. Isn’t it a major deal? Yes, but don’t get too worked up over it. Although this is your first post, it will not be your last. Your blog should evolve along with your business.
Focus on presenting yourself and your company in your own voice when it comes to the actual article content. Rather than jumping right into the regular blog entries, your first post is a perfect way to establish the framework for what your blog will be about. Yes, the post is vital, but you’ll be able to expand on your initial foundation with future articles.
Stay focused on your main objective
The goal of your blog as a business is to create relationships with your readers in order to expand your brand. How can you maintain coming up with excellent contents after that initial article to keep your blog moving forward? The trick is to stay focused on your main objective, which should be your products and services. Writing your blog contents will be easier for you and more successful at catching targeted viewers if you keep your posts focused on those points.
Share and promote your posts
First, let your social media followers know about your new blogging endeavor. It’s a wonderful approach to personalize your business while also providing an excellent beginning point for customers looking for additional information. Second, think about incorporating social media plugins into your WordPress site.
Make it simple to share, and watch as new clients arrive as a result of referrals from their friends. There are also a number of WordPress plugins available if you want to go beyond social media marketing and into the area of SEO (Yoast being a big one). These are designed to assist you to simplify your WordPress blog and posts in order to make your site more search engine friendly, and they’ll come in handy if you’ve never maintained a blog before.
Are you interested in learning more about WordPress?
If you want to learn more about WordPress or if you are Looking for high-quality WordPress services, Orange Web Group’s leading team of WordPress developers and Web Designer in Orange County are here to help. Contact us today so we can discuss your requirements.
Final Thoughts
You’re ready to put your words out there now that you know how to add a blog to your website. Hopefully, these ideas and tips will help you feel more at ease about your new blogging endeavor.
Looking for Website maintenance or Web Designer in Orange County? you might want to consider Orange Web Group. We are a full-service digital marketing agency and Web Designer in Orange County with expertise in search engine optimization (SEO), pay-per-click (PPC), social media marketing and management, mobile app development, Website Maintenance, and custom site design.


